System Thread Exception Not Handled error is a fixable issue. You need to take some easy steps to solve. But are you know, why system thread exception not handled error cames in pc?
I think its also important to know why? Because when you knew the perfect reason then, the second time you will easily deal with system thread exception not handled error or you can stop before coming in your pc.
GPU is responsible for this, When you put a lot of pressure on your pc that, time Graphics driver, not control overload then, you see system thread exception not handled error.
These examples are clear your thought when you are using any heavy software like after effects, Maya, Unity or any hight graphic game that times. But don’t worry you need to take simple steps to solve this issue.
Read more: High Memory Usage Windows 10
Fix System Thread Exception Not Handled Error
Blue screen errors common for corrupted drivers, like dxgmms2.sys, ntfs.sys, AMU Star.sys, etc. Now let’s see, how we find out the problematic driver and how to fix system thread exception not handled error.
Check Update BIOS
When you are not complete Installing BIOS update by yourself, then you should contact your manufacturer for assistance.
Basic Input Output System (BIOS) memory conflict or BIOS incompatibility or Interrupt Request (IRQ) conflict can be the cause error as well. So have to try to update BIOS latest version.
Let’s following simple steps, First, go to your motherboard manufacturer’s website and check BIOS update is available for you or not.
Please make sure that you know the Product Name of the motherboard.
How find the motherboard model number?
If you don’t know the motherboard model number then these simples steps help you to find your motherboard model number.
- Press both key same time window key and R key for an open run.
- After that type cmd and press Enter on your keyboard or click “OK”
- Next or last step you have to type one line code which is “wmic baseboard get manufacturer, product” then press “Enter” key
- After type code press enters then it’s showing your manufactures name and product details model number.
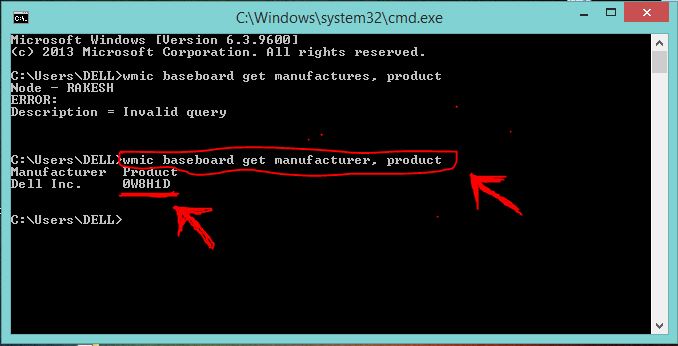
You can see above the screenshot the manufacturer is a dell and the module or product number is 0W8H1D.
Or,
You can go to the computer or laptop manufacturer’s website if are you bought from a store. Also, you can search through a computer model and download BIOS latest update.
The BIOS file in .zip format or .exe format yea it’s true it’s a little bit hard to install the BISO update but our steps make it easy for you.
Every manufacturer Installation process different, But don’t worry manufacturers provided a guide of installations on their website. Also, you can see when to download the BIOS update. But here we are showing you an all-rounder method which works on any pc or laptop.
How to install BIOS
After download, make sure your laptop has more than 70% change or you can plugin you pc before the start.
Unzip or extract your BIOS zip file, just right click and choose the “Extract files” option.
When Extracting done, then don’t forget to read the “README” text file. Before progress needs to check out. Which helps you to do easier your next step.
Next, plug a blank USB flash drive into your pc or laptop and move or copy the BIOS update file into that USB. Don’t unplugged USB flash driver.
How to access the BOIS system
Simply restart your pc, I think it’s you know. When scree off and opening your pc automatically, that time press your manufacturer selected key, this key you got into README file which we told to read.
But most pc manufacturers use f12 key in your keyboard, some PC use Esc or Del (Delete) key.

If you forget README file then go to google and search after type “pc manufacturer” then the “model name” and “BIOS key” (for example: “Dell Inspiron bios key” result you can see below the screenshot)
When opened the BIOS SETUP UTILITY window, Then if you see the “save” or “backup” option on the main Screen of BIOS. then choose and go to with your screen instruction.
How to update BIOS
BIOS update process is a little bit different, it’s heavy on manufacturers, so you have to check out their site to know, the right process to do well.
But most popular ways are, make sure your USB drive showing, then first go to Boot tab then go to Advanced tab and select Start Flash option.
Another way is When you plugged USB flash drive then a unique menu will show on the screen, where you will see BIOS key click on that, then update option and follow screen instructions.
After allowing for the update, the process can be taken a few minutes to as hour all depending on the depth of BIOS update and your pc performance. When it did, You pc automatically restart itself.
Don’t turn off or do any other thing when BIOS updating and Installing time. Only you should be waiting for the finish and until on the normal screen, after the restart.
After BIOS update we hope System Thread Exception Not Handled error will go if not then you can check out the next method. Most of the cases BIOS update solve their issue.
Update drivers (Especially Graphics card)
Some time system thread exception not handled error fix after update drivers. So, at first, make sure your GPU driver up to date.
When Inbuilt graphics driver or AMD or NVIDIA driver incompatible or corrupted then blue screen, system thread exception not handled error came.
Automatically driver update
But we are don’t remember to update our system driver time to time, truly it’s not possible. When you have the option up to date all drivers automatically why are you waiting?

For automatically up to date your all drivers you need to use third-party tools that update all drivers easily. Many tools are available but we suggest using Driver Easy or Driver Booster. So always your pc up to date with the new version of drivers automatically.
Manually Driver update
If you want to update manually then follow our steps which also easy to do.
Open “Device Manager” if you don’t how to open it, Just go to the Start menu then type “devmgmt.msc” or also you can type in run to open Diver manager.
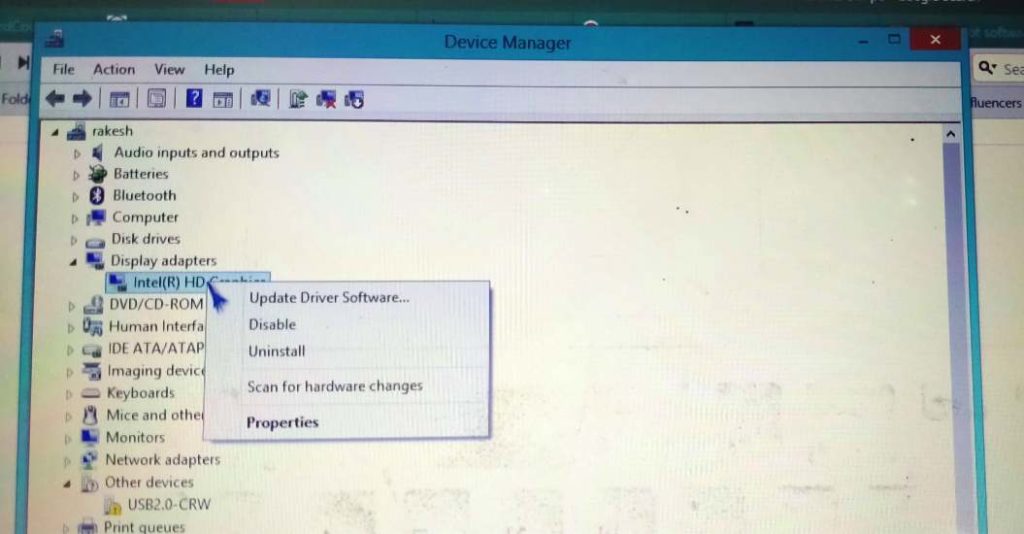
After open you will see all drivers list, now right-click on any preferred driver the select “update driver” option then follow screen instructions with a couple of clicks for successfully update.
You need to do some work with all drivers. When you are done with all drivers, simply restart pc.
Software issue
Many times your antivirus or any heavy software causes the system thread exception not handled the error. When it came after updating or installing any software then you should uninstall that one to fix it.
We are found mostly on antivirus because it also manages and monitoring every time and runs many programs behind the screen. When any programs startup corrupted then this cause came out.
But if you don’t find the right software or you want to check your all software working fine or not? That purpose Clean Boot helps you.
It’s a third-party service, which perfectly detects the problematic service or software, disables or uninstall to fix system thread exception not handled error easily.
Hard Disk Problems
When Hard Disk corrupted system thread exception not handled issue normal that time, But here we repaid Hard Disk with a couple of steps which you have to follow if you want to repair your self.
Some peoples are not able to appear BSOD boot windows before the login screen. That’s why the first repair Master Boot Records (MBR). So follow the below steps to fix MBR.
Open command prompt and type commands one by one after pressing the “Enter” key.
- bootrec.exe /rebuildbcd
- bootrec.exe /fixmbr
- bootrec.exe /fixboot
- chkdsk /r c:
After complete, the blue screen not interrupting you a longer time.
Read more: Get Help with File Explorer in Windows 10
Fix Windows system files to fix system thread exception not handled error
You can also try this method which will help you. Because many of the time scanning and windows system file fixing methods solve many errors.
Here again, open command prompt (window + r key for open run the search “cmd” and click ok to open the command prompt)
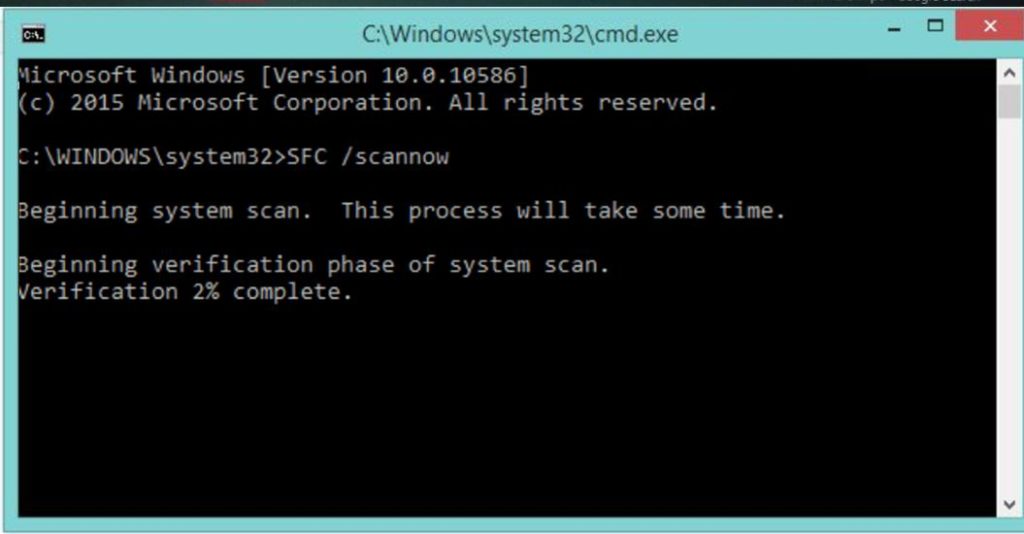
Type the “SFC/scannow” then press “Enter” key.
After doing this automatically scan error in your system and also fix it if have anyone. You have to wait to complete the process then restart your pc in a normal way.
BSOD error
If System Thread Exception Not Handled dxgmms2.sys file or another file responsible for the BSOD error. Then copy the file name and search into google. Basically this site shows you all the details about that file, like name, built-in functions, etc.
After known and finding that, uninstall the driver to resolve System Thread Exception Not Handled error, and again need to restart and reinstall.
Tips from us:
When you unable to boot into your pc or laptop, that time you can boot pc form a recovery drive. Go to Command Prompt to go “C” path (type “cd..” then press “enter” )
- cd Windows\system32\drivers
- ren dxgmms2.sys dxgmms2.old
Here we take “dxgmms2.sys” for example you can change with your file name.
After doing it hope, now you should successfully boot up. Then download the driver and install it with the above commands.
Also, you can use Backup or restore or Windows System Restore amazing feature which rolls back or restore you pc (But its work when it enabled).
Bottom Line
System Thread Exception Not Handled (system_thread_exception_not_handled) error is now you can fix with these easy methods. Further, you face any issue about system_thread_exception_not_handled error or another error, then don’t’ forget to comment on us. We are happy to help you.
Pingback: Is advanced systemcare safe or not? » TRONZI
Pingback: Windows Defender Blocked by Group Policy 2019 fix » TRONZI